


Introduction
The products on this site are based on the idea that customers create their own manuscripts and submit them as “complete manuscripts”.
A “complete manuscript” means that there are no problems with the manuscript or data, and that the manuscript is ready for printing without any modifications by us.
We have prepared a variety of manuals so that even first-time authors can easily create a complete manuscript!
Also, our checks of the manuscripts are mainly to make sure that they are ready for printing and that there are no obstacles to the production process. However, as a general rule, we are unable to contact you regarding problems with the design, content, or layout of the manuscript.
We ask that you check your manuscript thoroughly before submitting it.
※If you would like us to typeset your document (for a fee), please contact us in advance.
Mode
>> How to make a multicolor manuscript (Japanese)
>> “Printing and Binding Glossary” for doujinshi circles (Japanese)
Basics of Manuscript Size
◆Cover manuscript
■ Prepare the manuscript in the actual size of the book you want to make.
※Enlarging or reducing the finished manuscript may cause problems such as deterioration of image quality or moire.
■ Create a single file for the front cover, back cover, and spine.
If you are creating the front cover (first cover) and back cover (fourth cover) separately, please indicate whether there is a spine or not and which side of the first or fourth the spine will be taken from.
※Make sure to add 3mm margin to the top, bottom, left and right.
How to calculate the cover size
 |
|
| B5 cover Vertical: 263mm (Height: 257mm + 3mm each for top and bottom margin) Width: 370mm + spine width (First cover page: 182mm + spine width + Fourth cover page: 182mm + 3mm for each side) |
A5 cover Vertical: 216mm (Height 210mm + 3mm each for top and bottom margin) Width: 302mm + spine width (First cover page: 148mm + spine width + Fourth cover page: 148mm + 3mm for each side) |
Spine width can be calculated automatically by using our Spine Width Calculator.
>> Download the manuscript template.
◆Text Manuscript
Make your manuscript in the original size of the book you wish to produce.
If the manuscript is enlarged or reduced in size, image quality may deteriorate and problems such as moiré may occur.
Add 3mm to the finished standard size.
| Finished size | Manuscript size (including margin) | |
|---|---|---|
| B5 | 182mm×257mm | 188mm×263mm |
| A5 | 148mm×210mm | 154mm×216mm |
| B6 | 128mm×182mm | 134mm×188mm |
| 新書(Shinsho) | 114mm×182mm | 120mm×188mm |
| 文庫(Bunko) | 105mm×148mm | 111mm×154mm |
>> Download the manuscript template
Printing Area and Margin
Print area and margin
If the pattern extends to the edges of the finished size, you need to add 3mm at the top, bottom, left and right margins.
(No additional margin is necessary if the finished size does not include letters or patterns, such as novels.)
Notes on manuscript preparation
For the pattern that will be cut off, draw the picture to the fullest extent
If the pattern or tone has been cut off, white edges may appear when the book is finished.
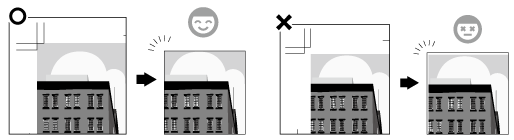
Draw the pattern so that it fills up the space!
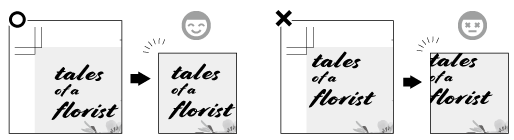
Do not place important characters or patterns near the cut-off line
Do not place important characters or designs within 2mm of the cut-off line, as slight misalignment may occur during binding. You can make more room by inserting more than 5mm inward. It is best to place important characters etc at least 5mm from the manuscript cut-off line.
Put things you don’t want cut inside the cut line as much as possible!
The gutter side (the side where the book is bound) becomes difficult to see
Text and designs will be difficult to see on the binding side of the book. We recommend that you do not place important text or designs within 10mm of the binding side.
How to Assign a Folio (page numbering) and a Filename
How to name book cover data files
Name the cover file “Cover.psd” or some other easy-to-understand name using half width alphanumeric characters.
- Example 1 When creating the front and back covers separately: “Cover1.psd” “Cover4.psd”
- Example 2 In the case of a multi-color cover, name the files “Cover_07Red” and “Cover_30Wakakusa” (*Numbers are Ryokuyousha basic ink color numbers)
- ※Only for the folded binding book set attach the data corresponding to the front and back covers with the same serial number (01.psd, 16.psd, etc.) as the main body with single-byte numbers only.
- ※Do not use full width characters or kanji/kana characters, as these will result in garbled characters and slow processing of your manuscript, which may lead to printing accidents.
About the folio (page numbering) of the text
- The folio of the main text is mandatory for all pages.
We cannot respond to incorrect pagination, missing pages, or reprinting due to inadequate page numbers.From the standpoint of readability, create page numbers with a size of 2mm or more for the vertical width of one character.When placing page numbers on a white background, use black (K100%) characters, and when placing page numbers on a solid black background, make the font color white or surround the characters with a white frame. 
- A hidden page number is necessary even if you do not want to include a page number due to the design.
Create the hidden page number: Font size is 6pt (vertical width of 1 character: approx. 2mm) or more, color is black, inside the finishing line. (Example: 7pt = 2mm for Hiragino Kaku Gothic) -
If there is a problem with the page numbers, we will give priority to the file name and add the page numbers before proceeding.
If we add a folio (page numbers) at our side for you, it will be “all hidden folio”, and a work fee (50 yen + tax per page) will be incurred.
※In the case of saddle stitching, a very small page number is placed on the binding side of the booklet in the same way as perfect binding. Note that the page number is slightly visible. 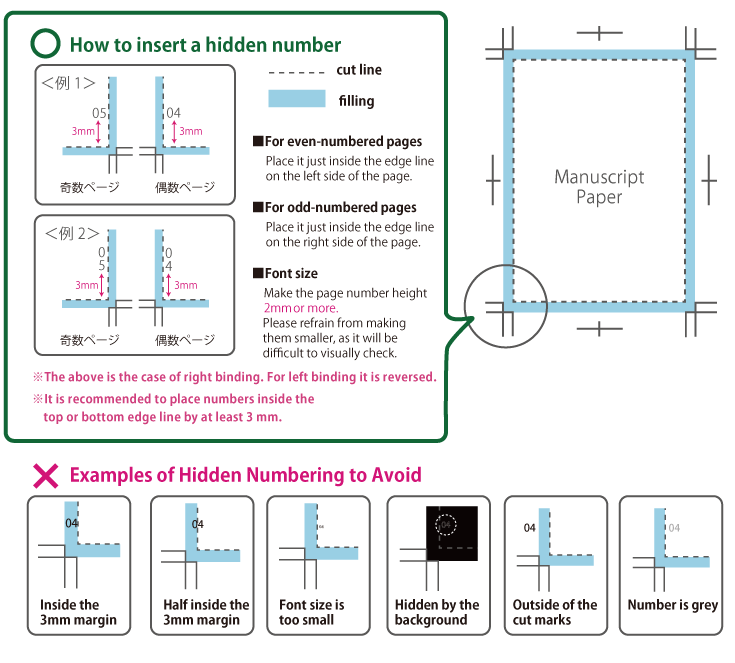
- Please create one piece of data per single page. If you are creating a double-page spread that requires strict picture matching, please be sure to let us know.
(※In the case of PDF, there is no problem even if multiple pages are created for one data.)

In CLIP STUDIO PAINT, if you reduce the size of the original document and save it, the hidden page numbers will be exported 0.4mm beyond the finished position.
Therefore, if you want to reduce the size and save it, adjust the hidden page numbers or place normal page numbers.
●How to change the position and size of the page numbers
Select the [Operation] icon from [Tool], and then select [Object].
With [Object] selected, click the page number you want to change the position or size of, and you can freely change the selected object.
Objects can be moved by clicking and dragging the center of the object. Click and drag the 9 points surrounding the object to scale the object.
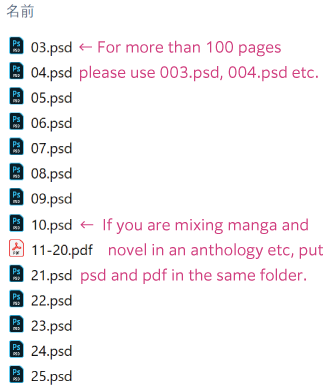
How to Name Body Text Data Files
- Be sure to match the body file name with the same number as the page numbers.
- ※Using double-byte characters or kanji characters will result in garbled characters, which will take time to process the manuscript and lead to printing accidents.
- ※Romanization of titles and parts of the text is also a source of accidents. Use only numbers for file names in the body of the text.
○【Good example 1】Manga/illustration manuscript (psd, etc.), such as page 3 → 03.psd, page 4 → 04.psd (If 100 pages or more, 003.psd, 004.psd, etc.)
○【Good example 2】Novel manuscript (PDF, etc.), such as pages 3-10 → 03-10.pdf (If 100 pages or more, 003-010.pdf, etc.)
×【Bad example 1】Page number and file name are different, such as page 3 → 01.psd, page 4 → 02.psd
×【Bad example 2】Contain characters other than numbers, such as text_03.psd, text_04.psd
Supported Data Environments
 |
 |
 |
 |
 |
Compatible environments
【Supported OS】Windows, macOS, iOS, Android
【Supported Applications】Photoshop・Illustrator・InDesign CC / ComicStudio・CLIP STUDIO PAINT / Word2019 (Mac version: 2011) / FireAlpaca / MediBang Paint / Procreate.
Other applications require prior consultation.
>>Click here for the export method for each application
Color Mode
When creating a full-color manuscript
●Use the manuscript creation software to set the color mode to RGB or CMYK and export it. Since the RGB mode has a wider color gamut than CMYK, vivid colors are expressed.
If you are concerned about color becoming subdued when converting from RGB to CMYK
At Ryokuyosha, we may take measures to reduce subdued colors with high-definition FM printing.
>>Visit “Points for creating beautiful RGB manuscripts”
When creating a single-color cover manuscript or black-and-white body manuscript
The color mode should be changed. Select “grayscale” or “monochrome 2 gradation” and export and save.
Refer to the specific preparation method described in each software item.
How to Export by Application
Currently, most of our guides on how to export manuscripts are in Japanese. Please bear with us as we create English versions. If you have any questions about using any of these applications for exporting a manuscript to send to us, please contact us using this Contact Form.
 Photoshop原稿作成マニュアル
 Illustrator原稿作成マニュアル
 CLIP STUDIO原稿作成マニュアル
 Word原稿作成マニュアル
 InDesign原稿作成マニュアル
 COMIC STUDIO原稿作成マニュアル
 MediBang Paint原稿作成マニュアル
 MediBang Pro原稿作成マニュアル
 FireAlpaca原稿作成マニュアル
 Procreate原稿作成マニュアル
 アイビスペイント原稿作成マニュアル
 縦式原稿作成マニュアル
 アナログ原稿作成マニュアル
 多色刷り原稿作成マニュアル
 Basic manual of manuscript preparation
How to Compile Data Files
Send the data files together in one folder for each order.
●Create a folder, put all the submitted data together, and compress it.
※Data may be damaged if sent without compression.
●For the folder name, use half-width alphanumeric characters to make it easy to understand, such as the reservation number or title.
If the data is too heavy to send, there is no problem in dividing it up. (Describe so that it can be understood that it is divided into more than one part).
In the case of FTP, it is possible to increase the capacity, so please contact us if required.
●Be sure to make a backup before submitting your manuscript.
Do not include any data not necessary for printing in the submitted data.
Related Links