How to export and submit your manuscript using CLIP STUDIO PAINT easily, without fail
In this issue, using CLIP STUDIO PAINT, we will introduce the three main themes of “how to export without fail”: the flow from completion of the manuscript to export, settings, and items to pay attention to.
- ・I don’t know how to save data for submission.
- ・I cannot save the data with the color I expected.
- ・After saving the data, the size changed and the text was cut off.
Don’t worry, we will answer these questions!
1.Export Process
CLIP STUDIO PAINT has two export methods: individual export and batch export.
Open the [File] menu > [Export (Single Layer)] > [psd (Photoshop Document)…].
■How to export in a batch (CLIP STUDIO PAINT EX only)
Open the [File] menu > [Export multiple pages] > [Batch export…].
If you are handling a large number of pages, such as anthologies or compilations, we recommend the EX version, which has a batch export function! The EX version allows you to select and save data one at a time, saving you time and effort!
The data to be submitted is basically exported by integrating images. If you have prepared layers for special processing options such as hot stamping, glitter coat or pearl ink, please integrate all layers except for the layer for processing.
2.Export Settings
The images below are for exporting a color cover and monochrome text. Let’s go through the items in order from the top!

The images are the psd export settings of CLIP STUDIO EX confirmed with Ver.2.0.1.
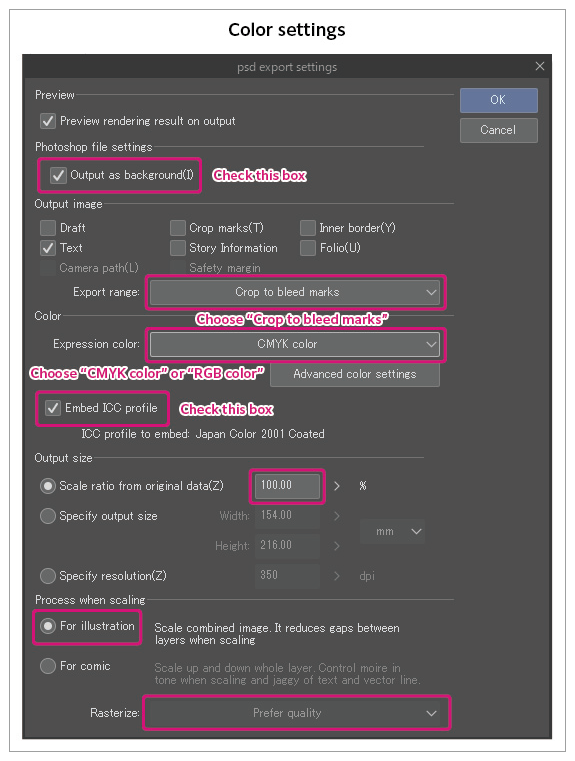
Check “Output as [background]”.
[Output image]
“Text”: If you are entering text, be sure to check it.
“Folio”… When writing the main text, be sure to check the box.
“Export range”… Select “Crop to bleed marks”.
[Color]
“Expression color”… Select the desired color mode that matches the content of the document.
Check “Embed ICC profile”.
[Output Size]
Set to 100% scaling from original data.
When changing the size of a book, such as a re-recorded book (compilation), select “Output Size” and set the size including the margin area.
[Processing when scaling]
For Rasterize, Select “Prefer quality”.
3.Items to note
There are two important items in the export settings. These are the expression color that determines the final color when saving, and the output size that determines the size of the exported file.
・Expression color
・Output size
Depending on the selection of the expression color and output size of the output image, the export result will change greatly. These items are important to consider when you are in a hurry before submitting an image. The following is a comparison of export results!
Expression Color
This item allows you to select the color mode of the original document.
Color mode is how colors are displayed on the data. For color printing, select RGB or CMYK mode. For single-color printing and text, choose grayscale or two-tone black-and-white.
[Expression color export pattern]
Full-color originals: RGB or CMYK
Single-color printing/black-and-white manuscript: grayscale or monochrome 2-tone
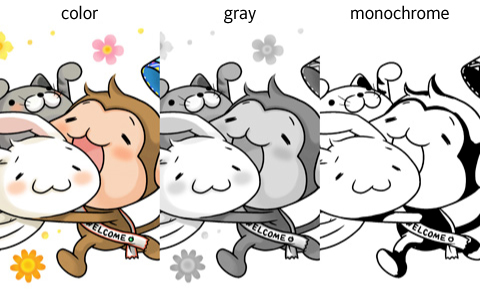
The image is an export comparison, with color, gray, and monochrome 2-tone (black-and-white) for the colors represented.
“Color”…Expressed in full color
“Gray”…Expressed between white and black including gray
“Monochrome”…Expressed in black-and-white only
Here are some common mistakes.
・ Save the expression color of the manuscript made in black as RGB or CMYK.
・ Save the data painted in gray as black-and-white.
With black-and-white printing, gray areas such as skin, clothes, and backgrounds are either white or black.
Output size
This item allows you to select the image size for export.
The settings are exported in the actual finished size plus the margin area.
“Export the entire page”…The entire image size is exported.
“Export up to bleed marks”… Output up to the finished size + margin area.
“Export to the inside of the register mark”: Export in the actual size of the finished size.
If you select “To the inside of the register mark “, the data will be written out in actual size, without the margin area that is necessary for bookbinding and cutting. This size cannot be used as data for printing.
We hope that you will remember this article and read it again before preparing and submitting your manuscript!
At Ryokuyousha, we handle a lot of data submitted in CLIP STUDIO PAINT. We look forward to receiving your doujinshi and goods submissions!
Related Links
CLIP STUDIO Manuscript Preparation Manual (Japanese)
Printing and Binding Glossary for doujinshi circles (Japanese)
What are CLIP STUDIO PAINT’s Expression Colors? Part 1 (Japanese)
- 初期費用ゼロで同人誌が作れる「ゼロエン同人印刷」を使ってみよう
- 蛍光ピンクで人物をより魅力的に!きゅるんと可愛い表紙が作れる「表紙5色カラー」
- 大人気の遊び紙「グリスター」が常備化!選べる4色と活用アイデアをご紹介
- 【もっと紙を楽しみたいあなたへ】「特殊紙カラー表紙」追加3種の魅力を徹底解説!
- 【心躍る特殊装丁に♪】トムソン加工で表紙と口絵を楽しく演出!
- 同人誌制作に最適!テーマや色で簡単に選べる「加工オプション検索ツール」
- 【印刷所おすすめ】紙と印刷色の組み合わせ&WEBで簡単シミュレーション!
- How to export and submit your manuscript using CLIP STUDIO PAINT easily, without fail
- 【読めば解決】「MediBang Pro(メディバンプロ)」の同人誌制作・入稿方法【簡単】
- 【同人サークル様必見】デジタル印刷とオフセット印刷の特徴を解説